Laravel And Vue Contact Form

In this tutorial we will learn about how to create a contact form in vue and using laravel REST API as a back end and for mailing i am using amazon SES. If you are new to VUE and laravel then go through our previous topic basics of laravel and vue js.
Lets start our steps :
Lets start with basics of Laravel as a back end and front end as VUE : –
1.Install the composer in your system if it’s not exist.
2. Open the command prompt and type composer create-project laravel/laravel myblog
3. Go your folder by changing directory from the command prompt cd foldername
4. Install the UI package composer require laravel/ui
5. Type the scaffolding php artisan ui vue
6. Now install node_module npm install be sure that node js is install in your system.
7. Now install npm install vue-loader
8. Now run npm run watch , while working in the front end this will help you to see the modification running in your browser. But be sure once your work is done then run npm run production for deployment.
9. Now open and rename file ExampleComponent with Contact resources/js/components/Contact.vue and copy this code
<template>
   <div class="container">
    <p style="color:red" v-if="success">Message Send !</p>
         <form @submit="submitform">
                <h1>Wontonee Contact Form</h1>
                 <div class="form-group">
                  <label for="exampleInputName">Name</label>
                  <input type="text" class="form-control" id="exampleInputName"
                  placeholder="Name" required name="fullname"  v-model="fullname" >
                </div>
                <div class="form-group">
                  <label for="exampleInputEmail1">Email address</label>
                  <input type="email" class="form-control" id="exampleInputEmail1" aria-describedby="emailHelp"
                  placeholder="Enter email" required v-model="emailaddress">
                </div>
                 <div class="form-group">
                  <label for="exampleInputEmail1">Comment</label>
                  <textarea name="comment" id="comment" class="form-control" required v-model="message"></textarea> </div> <button type="submit" class="btn btn-primary">Submit</button> </form> </div></template><script type="rocketlazyloadscript">export default {mounted() {console.log('Component mounted.')
}}</script>
10. Change the config details in resources/js/app.js
Vue.component('contact-component', require('./components/Contact.vue').default);
11. Create an email template blade `mailtemplate.blade.php`
<!DOCTYPE html>
<html lang="en">
<head><meta charset="UTF-8">

    <meta name="viewport" content="width=device-width, initial-scale=1.0">
    <meta http-equiv="X-UA-Compatible" content="ie=edge">
</head>
<body data-rsssl=1>
    <table width="100%">
        <tr>
            <td>Name : {{ $fullname }}</td>
            <td>Email address : {{ $emailaddress }}</td>
            <td>Message : {{ $msg }}</td>
        </tr>
    </table>
<script>class RocketElementorAnimation{constructor(){this.deviceMode=document.createElement("span"),this.deviceMode.id="elementor-device-mode",this.deviceMode.setAttribute("class","elementor-screen-only"),document.body.appendChild(this.deviceMode)}_detectAnimations(){let t=getComputedStyle(this.deviceMode,":after").content.replace(/"/g,"");this.animationSettingKeys=this._listAnimationSettingsKeys(t),document.querySelectorAll(".elementor-invisible[data-settings]").forEach(t=>{const e=t.getBoundingClientRect();if(e.bottom>=0&&e.top<=window.innerHeight)try{this._animateElement(t)}catch(t){}})}_animateElement(t){const e=JSON.parse(t.dataset.settings),i=e._animation_delay||e.animation_delay||0,n=e[this.animationSettingKeys.find(t=>e[t])];if("none"===n)return void t.classList.remove("elementor-invisible");t.classList.remove(n),this.currentAnimation&&t.classList.remove(this.currentAnimation),this.currentAnimation=n;let s=setTimeout(()=>{t.classList.remove("elementor-invisible"),t.classList.add("animated",n),this._removeAnimationSettings(t,e)},i);window.addEventListener("rocket-startLoading",function(){clearTimeout(s)})}_listAnimationSettingsKeys(t="mobile"){const e=[""];switch(t){case"mobile":e.unshift("_mobile");case"tablet":e.unshift("_tablet");case"desktop":e.unshift("_desktop")}const i=[];return["animation","_animation"].forEach(t=>{e.forEach(e=>{i.push(t+e)})}),i}_removeAnimationSettings(t,e){this._listAnimationSettingsKeys().forEach(t=>delete e[t]),t.dataset.settings=JSON.stringify(e)}static run(){const t=new RocketElementorAnimation;requestAnimationFrame(t._detectAnimations.bind(t))}}document.addEventListener("DOMContentLoaded",RocketElementorAnimation.run);</script></body></html>
12. Create a controller name php artisan make:controller ContactController
13. Create a function for mail
<?php

namespace App\Http\Controllers;

use Illuminate\Http\Request;
use Illuminate\Support\Facades\Mail;

class ContactController extends Controller
{
    //
    public function Sendmail(Request $request)
    {

        $contactform = $request->json()->all();

        $data = array(
            'fullname' => $contactform['fullname'],
            'emailaddress' => $contactform['emailaddress'],
            'msg' => $contactform['message']
        );

        Mail::send('mailtemplate', $data, function ($message) use ($data) {
            $message->from('saju.g@wontonetech.com', 'Contact Form');
            $message->sender('saju.g@wontonetech.com', 'Contact Form');
            $message->to('saju@wontonee.com', "Contact Form");
            $message->subject('Contact form');
          });


    }
}
14. Create a route for this routes/api.php
use App\Http\Controllers\{
    ContactController
};

Route::post('contact',[ContactController::class,'Sendmail']);
15. Now open contact.js component and link the form with the api by using the axios
<template>
   <div class="container">
    <p style="color:red" v-if="success">Message Send !</p>
         <form @submit="submitform">
                <h1>Wontonee Contact Form</h1>
                 <div class="form-group">
                  <label for="exampleInputName">Name</label>
                  <input type="text" class="form-control" id="exampleInputName"
                  placeholder="Name" required name="fullname"  v-model="fullname" >
                </div>
                <div class="form-group">
                  <label for="exampleInputEmail1">Email address</label>
                  <input type="email" class="form-control" id="exampleInputEmail1" aria-describedby="emailHelp"
                  placeholder="Enter email" required v-model="emailaddress">
                </div>
                 <div class="form-group">
                  <label for="exampleInputEmail1">Comment</label>
                  <textarea name="comment" id="comment" class="form-control" required v-model="message"></textarea> </div> <button type="submit" class="btn btn-primary">Submit</button> </form> </div></template><script type="rocketlazyloadscript">export default {data()
{return {fullname:'',emailaddress:'',message:'',success: false,}},methods:{submitform: function (e) {e.preventDefault();let self = this;
const params = JSON.stringify({fullname : this.fullname,emailaddress: this.emailaddress,message: this.message
});axios.post('api/contact',params,{headers: {"content-type": "application/json",},
})
.then(function (response) {self.success = true;
})
.catch(function (error) {// handle error
console.log(error);})
.then(function () {// always executed
});}},}</script>
16. Open resources/view/welcome.blade.php link your vue component here.
<!DOCTYPE html>
<html lang="{{ str_replace('_', '-', app()->getLocale()) }}">
    <head><meta charset="UTF-8">

        <meta name="viewport" content="width=device-width, initial-scale=1">

        <link data-minify="1" rel="stylesheet" href="https://wontonee.com/wp-content/cache/min/1/bootstrap/4.0.0/css/bootstrap.min.css?ver=1748912080" crossorigin="anonymous">
    </head>

    <body data-rsssl=1>
        <div id="app">
            <contact-component></contact-component>
         </div>
    <script type="rocketlazyloadscript" data-minify="1" src="https://wontonee.com/wp-content/cache/min/1/jquery-3.2.1.slim.min.js?ver=1748187962" crossorigin="anonymous" defer></script> <script type="rocketlazyloadscript" data-minify="1" src="https://wontonee.com/wp-content/cache/min/1/ajax/libs/popper.js/1.12.9/umd/popper.min.js?ver=1748187963" crossorigin="anonymous" defer></script> <script type="rocketlazyloadscript" data-minify="1" src="https://wontonee.com/wp-content/cache/min/1/bootstrap/4.0.0/js/bootstrap.min.js?ver=1748187963" crossorigin="anonymous" defer></script> <script type="rocketlazyloadscript" src="{{ asset('js/app.js') }}" defer></script> </body></html>
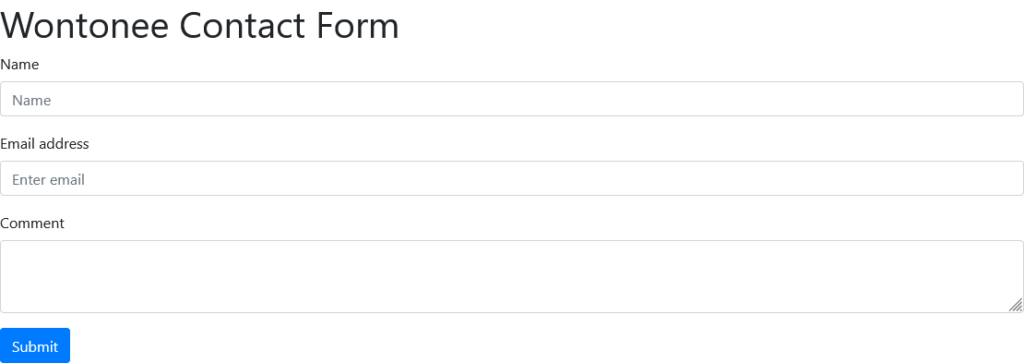
17. Run your contact form in browser you will see this

Contact
410 C, Jaina Tower-1, District Center, Janak Puri New Delhi-110058, India.
© Copyright 2025 Wontonee. All Right Reserved.
